Learn How To Create Tag Generator  HTML CSS and JavaScript


A tag generator is a tool used to create tags or keywords that help categorize content, such as blog posts, articles, or web pages. These tags make it easier for users to find relevant information by organizing content into specific topics or subjects. They’re essential for search engine optimization (SEO) as they help improve the visibility of content on the internet.

Below an Output :

Watch Video Tutorial

In this tutorial blog we are going to Create Tag Generator Using HTML CSS and JavaScript We Can Generate tag By typing Keywords. 

Lets start with Design HTML and CSS [Source Code]

First we need to create basic starting template with required links of CSS CDN links in  head section of HTML file.

				
					<!DOCTYPE html>
<html lang="en">
<head>
    <meta charset="UTF-8">
    <meta name="viewport" content="width=device-width, initial-scale=1.0">
    <title>Tag Generator</title>
    <link rel="stylesheet" href="style.css">
    
    <link rel="stylesheet" href="https://cdnjs.cloudflare.com/ajax/libs/font-awesome/6.4.2/css/all.min.css">
</head>
<body> <script src="script.js" defer data-deferred="1"></script> <script data-no-optimize="1">var litespeed_vary=document.cookie.replace(/(?:(?:^|.*;\s*)_lscache_vary\s*\=\s*([^;]*).*$)|^.*$/,"");litespeed_vary||fetch("/wp-content/plugins/litespeed-cache/guest.vary.php",{method:"POST",cache:"no-cache",redirect:"follow"}).then(e=>e.json()).then(e=>{console.log(e),e.hasOwnProperty("reload")&&"yes"==e.reload&&(sessionStorage.setItem("litespeed_docref",document.referrer),window.location.reload(!0))});</script></body>
</html>


					 <div class="tags-container">
        <div class="title">
          <i class="fa fa-tag"></i>
          <h2>Tags</h2>
        </div>
        <div class="content">
          <p>Press enter or add a comma after each tag</p>
          <ul><input type="text" spellcheck="false"></ul>
        </div>
        <div class="details">
          <p><span>10</span> tags are remaining</p>
          <button>Remove All</button>
        </div>
      </div>


/* Import Google Font - Poppins */
@import url('https://fonts.googleapis.com/css2?family=Poppins:wght@400;500;600;700&display=swap');
*{
  margin: 0;
  padding: 0;
  box-sizing: border-box;
  font-family: 'Poppins', sans-serif;
}
body{
  display: flex;
  align-items: center;
  justify-content: center;
  min-height: 100vh;
  /* background:#392e4a; */
  background: #204b5e;
}
::selection{
  color: #fff;
  background: #5372F0;
}
.tags-container{
  width: 580px;
  background: #fff;
  border-radius: 10px;
  padding: 18px 25px 20px;
  box-shadow: 0 0 30px rgba(0,0,0,0.06);
}
.tags-container :where(.title, li, li i, .details){
  display: flex;
  align-items: center;
}
.title img{
  max-width: 21px;
}
.title h2{
  font-size: 21px;
  font-weight: 600;
  margin-left: 8px;
}
.wrapper .content{
  margin: 10px 0;
}
.content p{
  font-size: 15px;
}
.content ul{
  display: flex;
  flex-wrap: wrap;
  padding: 7px;
  margin: 12px 0;
  border-radius: 5px;
  border: 1px solid #a6a6a6;
}
.content ul  li{
  color: #333;
  margin: 4px 3px;
  list-style: none;
  border-radius: 5px;
  background: #F2F2F2;
  padding: 5px 8px 5px 10px;
  border: 1px solid #e3e1e1;
}
.content ul li i{
  height: 20px;
  width: 20px;
  color: #808080;
  margin-left: 8px;
  font-size: 12px;
  cursor: pointer;
  border-radius: 50%;
  background: #dfdfdf;
  justify-content: center;
  line-height: 20px;
  text-align: center;
}
.content ul input{
  flex: 2;
  padding: 5px;
  border: none;
  outline: none;
  font-size: 16px;
}
.tags-container .details{
  justify-content: space-between;
}
.details button{
  border: none;
  outline: none;
  color: #fff;
  font-size: 14px;
  cursor: pointer;
  padding: 9px 15px;
  border-radius: 5px;
  background: #204b5e;
  transition: 0.3s ease;
}
.details button:hover{
  transform: scale(1.1);
}

/* Shake Effect */

@keyframes shake-horizontal {
  0%,
  100% {
    -webkit-transform: translateX(0);
            transform: translateX(0);
  }
  10%,
  30%,
  50%,
  70% {
    -webkit-transform: translateX(-10px);
            transform: translateX(-10px);
  }
  20%,
  40%,
  60% {
    -webkit-transform: translateX(10px);
            transform: translateX(10px);
  }
  80% {
    -webkit-transform: translateX(8px);
            transform: translateX(8px);
  }
  90% {
    -webkit-transform: translateX(-8px);
            transform: translateX(-8px);
  }
}

/* When User Clicks on  btn  */
.custom-anim{
  animation: shake-horizontal 0.8s cubic-bezier(0.455, 0.030, 0.515, 0.955) both;
}


Let's Move On Javascript

First of all we need to Retrieve element in JavaScript using queryselector method that allows you to select and retrieve elements from the DOM(Document Object Model) .   

after Retrieve Elements from DOM Define MaxTag . How Many Tags User Can Add Maximum . After That We need to Create an Empty Array for store tag.  

 Next Step Create Functions for  CountingTags CreateTags , Add and Remove Tag . After Creating Functions Apply Validations Like whether Maximum Tags limit crossed or not.   

				
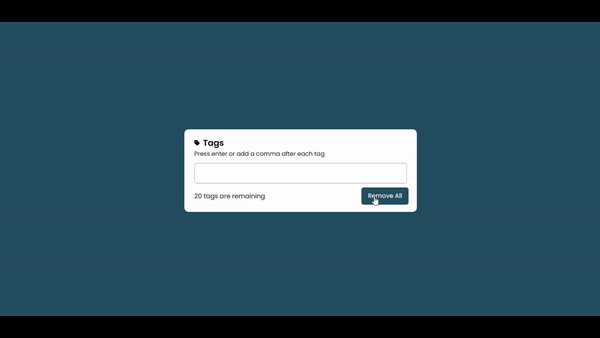
					const ul = document.querySelector("ul"),
input = document.querySelector("input"),
tagNumb = document.querySelector(".details span");

let notes = document.querySelector(".details p");

let maxTags = 20,
tags = [];


countTags();
createTag();

function countTags(){
    input.focus();
    tagNumb.innerText = maxTags - tags.length;
}

function createTag(){

    ul.querySelectorAll("li").forEach(li => li.remove());
    tags.slice().reverse().forEach(tag =>{
        let red=Math.random()*255;
        let green=Math.random()*255;
        let blue=Math.random()*255;
        let liTag = `<li style="background-color:rgba(${red},${green},${blue},0.3) ;">${tag} <i class="fa  fa-multiply" onclick="remove(this, '${tag}')"></i></li>`;
    //    alert(randomBgColor())
        ul.insertAdjacentHTML("afterbegin", liTag);
    });
    countTags();
    valid();

}

function remove(element, tag){
    let index  = tags.indexOf(tag);
    tags = [...tags.slice(0, index), ...tags.slice(index + 1)];
    element.parentElement.remove();
    countTags();
    valid();
}

function addTag(e){
    if(e.key == "Enter"){
        let tag = e.target.value.replace(/\s+/g, ' ');
        if(tag.length > 1 && !tags.includes(tag)){
            if(tags.length < maxTags){
                tag.split(',').forEach(tag => {
                    tags.push(tag);
                    createTag();
                });
            }
        }
        e.target.value = "";
    }
}

input.addEventListener("keyup", addTag);

const removeBtn = document.querySelector(".details button");

const container = document.querySelector(".tags-container");

removeBtn.addEventListener("click", () =>{
    if(tags.length == 0){
        container.classList.add("custom-anim")

        // For Remove Shake Effect
        setInterval(function(){
            container.classList.remove("custom-anim")
        },1400)
    }
    else{
        tags.length = 0;
        ul.querySelectorAll("li").forEach(li => li.remove());
        countTags();
    }
});

function randomBgColor(){
    let red=Math.random()*255;
    let green=Math.random()*255;
    let blue=Math.random()*255;
    return `rgba(${red},${green},${blue},0.3)`
}

// Added 

function valid(){
    if( maxTags <= tags.length){
        ul.style.borderColor="red";
        notes.style.color="red"
    }
    else{
        ul.style.borderColor="#a6a6a6";
        notes.style.color="black"
    }
}


More JavaScript Tutorials On YouTube

Leave a Reply

Your email address will not be published. Required fields are marked *